Sunday, November 1, 2015
Sunday, September 20, 2015
a highlighted hue.
I'm alive! Sorry it's been so long. Life has been wild and won't be tamed but there are contest deadlines and a task list way too long for me to sit back and chill :)
This week's scene started out with just the artwork in the bed frame, then branched out from there. You might recognize the blue wall shelves on the left from the Undersized Urbanite contest two years ago. I made it a twin to make it appear a bit more balanced.
The walls were painted last minute and are actually still wet as I'm typing, which explains the warped wrinkles they made.
This lil' ukulele has been riding around in my backpack in case I start to lose my sanity or someone asks me what a miniature is for the thousandth time.
I'm having to cut my plans on the CC2015 short by making the build smaller than my original plan due to deadlines. I'm such a procrastinator (example: this was supposed to be a Sunday scene but it carried from a late night to a Monday morning).
So glad to be back, all of y'all's progress on your builds and all that are looking amazing. I'm trying to catch up on all of you.
'Til next time! :D
Thursday, July 9, 2015
still nothing to show.
Bad news- I'm leaving again in the morning and won't be back for quite a while. I'm truly sorry blog readers, I will post again as soon as possible and maybe will be able to photograph miniatures while I'm gone to show y'all when I return. So sorry guys, again. No blogging is no fun.
'Til next time!
Saturday, June 27, 2015
nothing to show.
So sorry guys, but I've got nothing this week, and it will probably be another week and a half before I can post again. I'm leaving tomorrow and won't be back for a while so I'm sorry my blog-readers :(
'Til next time!
Sunday, June 21, 2015
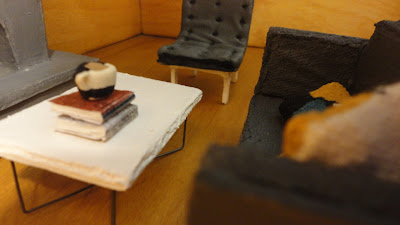
a minimalistic mess.
This week we don't have a break from grey :)
Here's some more grey.
I'm not so sure what I was thinking with the orange. I normally don't use orange... ever.
Since I have a limited stash of fabric (by limited, I mean that I have grey fabric, white fabric, and canvas) I used the white and Sharpie'd the lines on, which ended up a lot cleaner than normal. I started by painting the back but my shaky hands made the lines look like a heart monitor.
I heard that the Undersized Urbanite is gearing up for another round this fall! Be sure to check that out, there's no kit involved, and if you're a beginner in miniatures, there's a separate section for first-timers.
'Til next time! :D
Sunday, June 14, 2015
grey and greenery.
This week I made a concrete fireplace. I've always admired concrete in modern designs, especially in the architecture and not just the interior design. They acquire these wonderful little cracks over time that give it an aged look. Concrete can be used for sinks, tubs, kitchen counter tops and islands, and fireplaces (just to name a few things).
I first painted the fireplace a dark shade of grey and then dabbed a lighter shade over that.
I did a tutorial on the chairs last week.
The couch looks to me like one of those rugged couches you would get for cheap at a thrift store :/ That's okay, one day I'll figure out some magical technique that removes all the messiness involved with painting over hot glue and canvas at once.
Actually, having an all-grey living room was a mistake. I made the fireplace last week, but didn't finish the room so I did a tutorial. I ended up making these little pieces over time. Once I saw them all together I was just that's not quite right so I tried to inject as much colour into the scene as possible. I think it worked out alright :) I don't know, maybe I only think that because grey is my favourite colour.
'Til next time! :D
Monday, June 8, 2015
tutorial - no-sew tufting
I promised I'd make a tutorial on this quite a while back, so today is the day.
This is on how to make tufted cushioning without the sewing that I can never seem to understand. Needles... not my thing.
Materials-
Craft foam
Fabric
Mechanical pencil
Hot glue (only hot glue will work) preferably a low-temp gun
Paper
Optional (if you want to make the chair)-
Mat board
Paint
So to begin, cut your craft foam the length you want your chair or chaise or whatever you're making.
Mark with the pencil where you want the indentions to be.
Bend the foam and pinch one of the dots, snipping around it in a V - shape.
Pull the craft foam out and begin doing the same to all of your markings.
Cut a reasonable amount of fabric around the foam.
Using your pencil, push the lead back into the pencil and poke the pencil through the fabric so a little lump is barely extended above the hole on the other side. That didn't make much sense :) I'll show you.
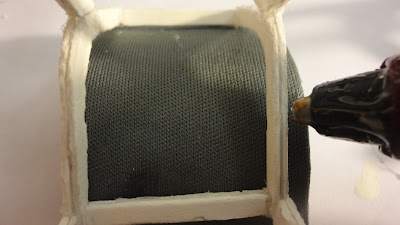
Drop a little bit of glue onto the lump and use the metal glue gun piece to spread the glue around. Wait for it to dry (should take about fifteen seconds) with your pencil holding still in its place. When the glue has cooled, pull your pencil out and the fabric will remain in the hole. Repeat for the rest of the foam.
They look like shiny spider eyes :/ I'm going to stop thinking about that.
Measure and cut another piece of craft foam identical to the first and glue it to the back.
Glue the remaining fabric to the back and trim it as neatly as possible.
Trace the whole thing onto paper and cut it out. Glue fabric to the piece of paper. Sorry, I forgot to take pictures of this part.
Glue it to the foam.
And you're done!
This next part is optional, it's just showing how I made the chair.
I drew and cut out the frame of the back of the chair.
I joined the two sets of chair backing with two of these.
For the chair legs, I set the frame against mat board, drew what I wanted the legs to look like, and cut it out.
I glued the legs to the frame.
After a coat of paint and a bit of sanding, I glued the frame to the foam.
When I made this tutorial I'd actually never done a trial run, so if you come across a better way to do it please tell me.
I've used tufted cushioning here and here, but I've never actually bent the foam after gluing the tufts in. I'll figure out how to get rid of those wrinkles.
'Til next time! :D
Subscribe to:
Posts (Atom)


